Welcome back to my blog. This post is for the first Action Project of the STEAM class, Light, Sound, and Time. For the first unit, Light, we started by questioning what would our life look like without light. We then learned how light can act like a particle and a wave, how light equals energy, and about the electromagnetic spectrum. This unit helped us understand the importance of light in our lives and all of its uses. We also learned about the human eye and how it takes in light to create an image in our heads. Color was a big part of this unit because it is a very small part of the electromagnetic spectrum humans can actually see. This part of the spectrum is called the visible light spectrum. We used trigonometry to solve problems of waves, the unit circle, and similar triangles. For this Action Project, we were asked to create a pinhole camera and use it to capture an image. My pinhole camera is made from a cardboard box and a lens made out of a soda can. I hope you enjoy reading about my camera.
Pinhole Camera, GS, 2022
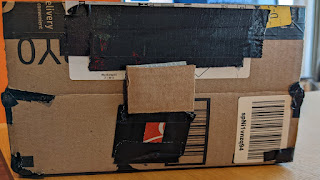
Camera Object, GS, 2022
All about the pinhole camera:
Camera Calculations, GS, 2022
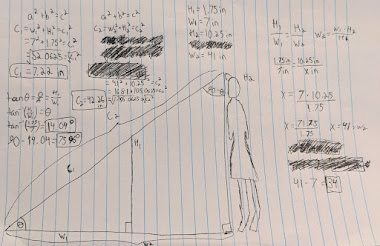
The Calculations Behind the Camera:
The distance from my lens to the photographic paper is 7 inches. The height of my pinhole is 1.75 inches tall from the bottom of the box. My object is 10.25 inches tall. After using similar triangles to solve for the minimum distance from the object to my camera I got 34 inches. The whole base of the larger triangle shown in the image or “W2” is 41 inches. To find the hypotenuse of my two triangles I used the Pythagorean theorem so “C1” equals 7.22 inches and “C2” equals 42.26 inches. I also solved for the angles of my triangle using the inverse tangent so the angle on the bottom left angle is 14.04 degrees and the top right angle is 75.96 degrees.

Pinhole Diagram, GS, 2022
The exposure time for my camera was 5 minutes. I left the shutter open for this long because I wanted to make sure all of the light coming off my object would reach the camera and hopefully print out a picture. As shown in the image above, the light rays hit the top and bottom of the object, travel toward the pinhole where they intersect, and move to the paper where the image is flipped after printing. For the duration of the 5 minutes, I was hoping the camera could capture as much of my object as possible.


Camera Object, GS, 2022
All about the pinhole camera:
Building a pinhole camera is very easy. First, you take a container such as a box and cut a small hole on one side of it. This opening will be for your lens. Second, make sure all of the openings on the box are covered with tape so no light can get into the box. Third, paint the whole inside of the box black. Fourth, cut out a piece of a soda can and poke a tiny hole in the center with a pin. Fifth, attach the lens to the box and create a shutter that goes over the lens when the light shouldn't go through. With all of the parts added, you are ready to take a picture.
How it works:
When the shutter of the camera is opened light shines through the pinhole onto photographic paper at the back of the box. With the help of some chemicals, the light then prints the image of the original source onto the paper creating the image.
When the shutter of the camera is opened light shines through the pinhole onto photographic paper at the back of the box. With the help of some chemicals, the light then prints the image of the original source onto the paper creating the image.
Science Concepts:
The pinhole camera does not use reflection or refraction. Refraction is the bending of light and reflection is light bouncing off of a surface. The image appears to be inverted because the light rays coming from the top and bottom of the object intersect at the pinhole so there is no bending or reflecting of light. This does not create reflection or refraction. The inside of the camera is painted black to prevent unwanted reflections when the light goes into the camera. The color black absorbs all colors so nothing can be reflected. White reflects all colors which would not be good for the camera. My camera demonstrates the principle of Wave-Particle Duality because the light rays intersect at the pinhole and continue traveling through the box where the image is printed on the photographic paper. This confirms that light can act as a wave because the light rays go through each other when they intersect which is how waves act. It also confirms that light can act like a particle because of its reaction to the paper and leaving a marking on it as a particle acts. The camera also demonstrates that light equals energy because of how the photographic paper reacts to light depending on the wavelength of the sunlight. Wavelengths are related to energy because a short wavelength and high frequency corresponds with higher energy and lower energy with the opposite. The electromagnetic spectrum plays a big role in this camera because the sun creates ultraviolet and visible light rays. UV rays have a high frequency and short wavelength which means a high amount of energy affects the camera. Visible light rays allow us to see colors or tones which can be seen on the finished image.
The pinhole camera does not use reflection or refraction. Refraction is the bending of light and reflection is light bouncing off of a surface. The image appears to be inverted because the light rays coming from the top and bottom of the object intersect at the pinhole so there is no bending or reflecting of light. This does not create reflection or refraction. The inside of the camera is painted black to prevent unwanted reflections when the light goes into the camera. The color black absorbs all colors so nothing can be reflected. White reflects all colors which would not be good for the camera. My camera demonstrates the principle of Wave-Particle Duality because the light rays intersect at the pinhole and continue traveling through the box where the image is printed on the photographic paper. This confirms that light can act as a wave because the light rays go through each other when they intersect which is how waves act. It also confirms that light can act like a particle because of its reaction to the paper and leaving a marking on it as a particle acts. The camera also demonstrates that light equals energy because of how the photographic paper reacts to light depending on the wavelength of the sunlight. Wavelengths are related to energy because a short wavelength and high frequency corresponds with higher energy and lower energy with the opposite. The electromagnetic spectrum plays a big role in this camera because the sun creates ultraviolet and visible light rays. UV rays have a high frequency and short wavelength which means a high amount of energy affects the camera. Visible light rays allow us to see colors or tones which can be seen on the finished image.
Camera Calculations, GS, 2022
The Calculations Behind the Camera:
The distance from my lens to the photographic paper is 7 inches. The height of my pinhole is 1.75 inches tall from the bottom of the box. My object is 10.25 inches tall. After using similar triangles to solve for the minimum distance from the object to my camera I got 34 inches. The whole base of the larger triangle shown in the image or “W2” is 41 inches. To find the hypotenuse of my two triangles I used the Pythagorean theorem so “C1” equals 7.22 inches and “C2” equals 42.26 inches. I also solved for the angles of my triangle using the inverse tangent so the angle on the bottom left angle is 14.04 degrees and the top right angle is 75.96 degrees.
Pinhole Diagram, GS, 2022
The exposure time for my camera was 5 minutes. I left the shutter open for this long because I wanted to make sure all of the light coming off my object would reach the camera and hopefully print out a picture. As shown in the image above, the light rays hit the top and bottom of the object, travel toward the pinhole where they intersect, and move to the paper where the image is flipped after printing. For the duration of the 5 minutes, I was hoping the camera could capture as much of my object as possible.
Final Image, GS, 2022
The image above is one of my pinhole camera prints. In the circle I added for reference, you can see a faint silhouette of my object which is a statue. Behind the statue is a fence that is shown in the print. There are several reasons this image did not turn out very well. It could be because of damaged paper, too much or not enough exposure to light, and more. I think the reasons I just listed could be the most apparent flaws in my camera. It is also possible the darkroom we used to set up the cameras had light getting in or the chemicals used to produce the image worked unexpectedly.
I hope you enjoyed reading about my pinhole camera. I thought this Action Project was really fun and I learned a lot about how the cameras work. I had many tries for capturing the photo and I did not always find what I was expecting. Through the different attempts, my object did not show up at all or only just barely appeared. Trying to get the right print can feel like a tedious process but it feels rewarding when the results turn out great. One of my biggest challenges for this AP was the box I chose for my camera. A problem with the Amazon box is the number of openings it has. If I were to try this again, I would use a different box with fewer openings so I have more control over how much light is let in. Again, I hope you enjoyed reading about my pinhole camera. Maybe it will inspire you to make your own. I hope to see you in the next blog.
Comments
Post a Comment